Category: Routine Guides

  • Retinal for Eyes: The Ultimate Guide to Smoothing Fine Lines and Dark Circles Safely

    Retinal for Eyes: The Ultimate Guide to Smoothing Fine Lines and Dark Circles Safely

    The skin surrounding your eyes is the thinnest and most fragile on your entire body, often described by dermatologists as being as delicate as a silk sheet. This is why it is the first area to show the “etched-in” evidence of stress, fatigue, and aging. While many reach for standard Retinol to fix crows’ feet, the modern gold standard for this sensitive zone is Retinaldehyde, or Retinal.

    Because Retinal is “closer” to the active form of Vitamin A than standard Retinol, it works up to 11 times faster to rebuild the underlying collagen structure. However, treating the eyes requires a specialized protocol to avoid the stinging and redness that can occur on thin skin. This guide explains the science of using Retinal for eyes, reveals how it targets both dark circles and wrinkles, and provides the definitive safety method for achieving a bright, firm, and youthful gaze.


    1. Why Retinal for Eyes? The One-Step Advantage for Thin Skin

    Diagram comparing retinol and retinal cellular pathways converting to retinoic acid in skin layers
    Illustration comparing retinol and retinal pathways converting to retinoic acid in skin cells.

    The primary challenge of eye care is a biological contradiction: the skin is too fragile to handle high-strength treatments, yet it is the area that needs the most intensive repair. Most people try to use their standard face Retinol near their eyes, only to experience immediate stinging or “crepey” dryness. This happens because the skin around your eyes is up to four times thinner than the rest of your face—think of it as a delicate silk sheet compared to a thick denim jacket.

    Retinal (Retinaldehyde) is the scientific solution to this problem. Because it is much more efficient than standard Retinol, it allows you to use a gentler concentration while still receiving a powerful signal for skin regeneration.

    The “Conversion Load” Secret: Standard Retinol requires two chemical “translations” inside your skin to work. This process takes energy and can stress thin tissue. Retinal is only one step away from being active, meaning your eye skin does less “work” to get better results.

    The Sensitivity Paradox: It sounds counterintuitive, but 11x faster results don’t mean 11x more irritation. Because Retinal is so efficient, clinical formulas can use lower doses that bypass the surface-level “burn” often felt with high-dose Retinol Serums.

    The Retinoid Ladder: Sitting significantly higher on the Retinoid Ladder, Retinaldehyde provides the clinical-grade power usually reserved for prescriptions, but in a formula balanced for the orbital zone.

    Targeted Bio-Availability: Retinal is more “bio-available,” meaning more of the Vitamin A actually reaches your skin cells to boost collagen, rather than sitting on the surface and causing redness.

    By choosing a specialized Retinal eye serum, you are respecting the unique anatomy of your eyes. You are delivering a high-speed “Repair Signal” to your cells while minimizing the chemical burden on your [healthy skin barrier].

    2. Structural Repair: Erasing Crows’ Feet and Fine Lines

    Fine lines around the eyes, popularly known as crows’ feet, are unique because they are “movement-based” wrinkles. Every time you smile or squint, the skin around your eyes folds. In youthful skin, high levels of collagen and elastin allow the skin to “snap back” like a fresh rubber band. As these proteins decline, those temporary folds become permanent. Retinal acts as the structural architect for this specific zone, focusing on rebuilding the internal support system so your skin can handle movement without creasing.

    Collagen Induction: Retinaldehyde is a potent signal for your fibroblasts, the “building” cells of your skin. It instructs them to produce a fresh surge of Type I collagen to fill in the microscopic “valleys” of fine lines from the inside out.

    Thickening the Dermis: The eye area looks “crepey” when the skin becomes too thin. Retinal actively works to thicken the deeper layers of the orbital skin, making it more resilient and less likely to sag or fold deeply when you smile.

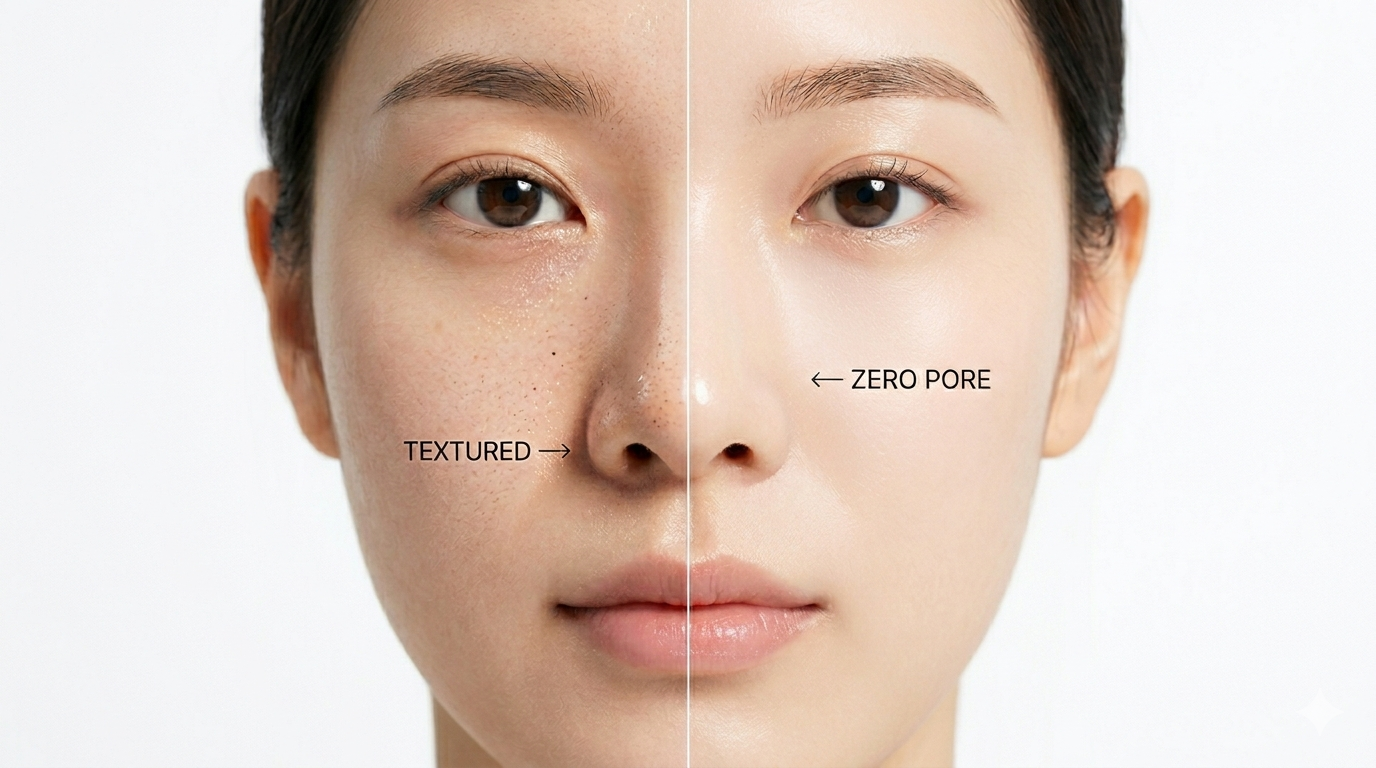
    The Concealer Fix: Rough, uneven skin texture is what causes makeup to “settle” and look cakey. By accelerating cell turnover, Retinal smooths the surface, achieving a more refined complexion where makeup glides on effortlessly.

    Long-Term Memory: Structural repair isn’t instant. While moisture helps immediately, the real “lifting” effect of skin regeneration takes about 12 weeks of consistent use as your new collagen matrix matures.

    Pro-Tip for Texture: If you find that your eye area looks “bumpy” or has tiny white seeds (milia), Retinal is the solution. Its ability to keep the pores clear prevents the protein buildup that causes milia, ensuring your eye area remains perfectly smooth and reflective.

    3. Beyond Wrinkles: How Retinal Brightens Dark Circles

    Most people assume dark circles are simply a sign of a bad night’s sleep. However, from a biological standpoint, those shadows are usually caused by two things: excess pigment on the surface or thin skin showing the blood vessels underneath. Retinal is one of the few ingredients that can treat both issues at once. By speeding up your skin’s renewal and thickening the delicate orbital tissue, it acts as a permanent “brightener” that works far better than a temporary concealer.

    Lifting Surface Pigment: If your circles are brown or grey, they are likely caused by sun damage or hyperpigmentation (PIH). Retinal accelerates cell turnover, forcing your skin to shed those pigmented cells faster and reveal a much brighter, more even skin tone.

    The “Frosted Glass” Effect: If your circles look blue or purple, it is because the skin is so thin that the blood vessels underneath are showing through. Think of thin skin like a clear window. Retinal signals the skin to build more collagen, which “thickens the glass.” As the skin gets denser, it becomes opaque, hiding the veins underneath and making you look instantly more rested.

    Antioxidant Defense: The eye area is highly vulnerable to free radicals from pollution. By providing antioxidant support, Retinal helps prevent the “hollow” and dull look that happens when skin cells are under stress.

    Total Tonal Clarity: Consistent use leads to a translucent, radiant finish. It doesn’t just “cover” the darkness; it fixes the structural reasons why the darkness is there in the first place, helping you achieve a refined complexion.

    Pro-Tip for Brightness: If your primary concern is “Tired Eyes,” look for a formula that pairs Retinal with Ginseng or Caffeine. These ingredients boost microcirculation, which helps “drain” the fluid that causes puffiness and makes dark circles look even more pronounced.

    4. The Orbital Bone Protocol: The Safe Method for High-Performance Results

    The skin on your eyelids is the thinnest on your body and lacks the density to process high-speed actives like Retinal directly. Applying potent formulas too close to the lash line is the #1 cause of the redness and stinging that makes users quit. To achieve a [luminous glow] without the “Retinol burn,” you must follow the professional Orbital Bone Protocol. This method relies on your skin’s natural heat to deliver the active ingredients where they are needed, ensuring maximum repair with zero irritation.

    Step 1: The Clean Foundation: Before applying any treatment, you must ensure the area is free of stubborn sunscreen and makeup. Use The Art of Double Cleansing every evening to provide a pristine canvas for the Retinal to work.

    Step 2: The “Dot” Placement: Dispense a tiny, rice-sized amount of Retinal eye serum onto your ring finger. Apply three small dots strictly along the hard ridge of the orbital bone—one under the eye, one at the outer corner (crows’ feet area), and one just under the eyebrow tail. Avoid the immediate eyelid and lash line entirely.

    Step 3: The Ring Finger Tap: Using only your ring finger—which naturally exerts the least amount of pressure—gently “tap” or “bounce” the product into the bone. This prevents the pulling and stretching of the skin barrier that leads to further sagging.

    Step 4: The Heat Migration Secret: You do not need to apply the cream to your wrinkles for it to work. As your skin warms up, the Retinal will naturally “migrate” about a half-inch inward toward the eye. This slow movement ensures the thinnest skin receives a buffered, safe dose of the active.

    Step 5: The Safety Seal: Once the serum has set for 2 minutes, press 1 drop of Squalane Oil over the area. This provides a non-clogging lipid shield that prevents TEWL (moisture loss) and locks the structural repair signals into your cells all night.

    Frequency Rule for Success: Follow the 2-2-2 schedule. Use the Retinal eye serum only two nights per week for the first two weeks. If your skin feels “quiet” and hydrated, you can slowly increase to every other night. This gradual approach is the secret to completing the <a href=”/skincare-methods/retinol-retinization-period-guide”>Retinization Process</a> without the drama of peeling or redness.

    5. Selection Criteria: How to Spot a High-Performance Eye Formula

    Because Retinal (Retinaldehyde) is a fragile and expensive molecule, the quality of the brand you choose is paramount. Not all eye creams are created equal; some use the name for marketing but lack the stability to deliver results. To ensure your investment leads to real collagen growth and structural repair, your formula must meet these three clinical standards.

    The Potency Marker (The Yellow Glow): High-purity Retinal is naturally a vibrant yellow or orange color. When you dispense your eye serum, it should have a noticeable golden tint. If the cream is stark white, the concentration of Retinal is likely too low to provide the “11x faster” results you are looking for.

    The Slow-Release Bubble (Encapsulation): Retinaldehyde is potent. To prevent stinging in the thin eye area, look for “Encapsulated” formulas. This means the active is wrapped in a microscopic lipid bubble that dissolves slowly overnight, delivering tiny, manageable doses to your skin cells rather than one harsh blast.

    The Barrier-Supportive Base: A high-quality eye serum doesn’t just deliver the active; it protects the construction site. Ensure your chosen product is rich in Ceramides, Niacinamide, or Hyaluronic Acid. These ingredients buffer the Retinal and ensure your skin barrier remains supple and non-reactive.

    Stabilized Packaging: Because Vitamin A derivatives break down when exposed to air and light, never buy a Retinal eye cream in a clear jar. Only choose opaque tubes or airless pumps to ensure the formula stays active until the very last drop.

    The Selection Rule: If you are a beginner, look for a concentration of 0.01% to 0.03%. If you have resilient skin and are targeting deep crows’ feet, graduate to 0.05% or 0.1%. Matching the strength to your tolerance is the only way to achieve an [even-toned glow] without the setback of redness.

    6. FAQs: Pro-Tips for Brighter, Firmer Eyes

    Treating the delicate orbital area with high-performance actives requires precision. Here are the most common concerns our readers have when introducing Retinal into their eye care routine:

    Q: Will Retinal make my eyes look more “hollow” or tired?
    A: No, it should do the opposite. Hollowness is usually caused by dehydration or thin skin. By building new collagen, Retinal actually thickens the dermis over time.
    The Pro-Tip: If you feel hollow at first, your skin is likely thirsty. Use a Hyaluronic Acid serum under your eye cream to plump the area while the Retinal works on the structure.
    Q: Can Retinal eye creams cause milia (tiny white bumps)?
    A: Actually, Retinal helps prevent them. Milia are often caused by heavy, waxy creams that trap dead skin cells. Because **Retinal** accelerates cell turnover, it keeps the pores clear and prevents the protein buildup that causes those tiny seeds.
    The Verdict: It is the best choice for achieving a perfectly smooth skin texture around the eyes.
    Q: My eyes are stinging slightly. Should I stop?
    A: Not unless there is visible redness or swelling. A mild tingle for 60 seconds is a normal part of the Retinization Process.
    The Pro-Fix: If the stinging lasts longer, use the “Sandwich Method”: apply a tiny bit of plain moisturizer, then your Retinal dots, then one more layer of moisturizer. This slows down the penetration for total comfort.
    Q: Can I use this if I wear contact lenses?
    A: Yes, if you follow the Orbital Bone Method. By keeping the product away from your immediate lash line, you ensure the cream doesn’t seep into your eyes and coat your lenses.
    The Safety Rule: Apply your eye treatment at least 30 minutes before bed to give it time to “set” so it doesn’t move while you sleep.
    Q: Should I use Retinal in the morning if I want faster results?
    A: No, it is strictly a nighttime active. Vitamin A is destroyed by sunlight, and its rapid cell turnover makes your skin highly sensitive to UV rays.
    The AM Protocol: Use a gentle Vitamin C eye serum for protection during the day and save your Retinal for the nightly repair cycle.

    7. Conclusion: The Definitive Solution for Rested Eyes

    Choosing a specialized Retinal for eyes is the most effective way to turn back the clock on your most delicate feature. By leveraging its “Active Proximity” and structural repair power, you move beyond basic hydration and start actively rebuilding your skin’s foundation. While the results are up to 11 times faster than standard formulas, the secret to success is respecting the fragile anatomy of the orbital zone. By mastering the Orbital Bone Protocol and prioritizing barrier-safe buffers like Ceramides, you can finally achieve the bright, firm, and youthful gaze you deserve.

    Patience and precision are the final active ingredients in this journey. Stick to the “2-2-2” schedule, protect your progress with daily SPF, and let the advanced science of Retinaldehyde deliver the radiant, rested results that topical creams alone cannot provide. Your eyes are the window to your youth—treat them with the specialized care they require for a truly [refined complexion].


    Ready to Transform Your Eye Area?

    To achieve clinical results, the quality of the formula is everything. We have vetted the top-rated Retinal eye serums based on their stability, encapsulation technology, and ability to minimize [skin irritation].

    The Precision Leader: Medik8 Crystal Retinal Ceramide Eye
    The industry standard for eye repair. It uses a tiered strength system so you can build tolerance safely.
    👉 Check Price & Availability on Amazon
    The K-Beauty Glow: Beauty of Joseon Revive Eye Serum
    A viral favorite that combines Retinal with Ginseng to boost circulation and reduce dark circles.
    👉 Shop Beauty of Joseon on Amazon
    The Clinical Repairer: Avene RetrinAL Eyes
    Specifically formulated for the most sensitive eyes, focusing on smoothing deep texture and crows’ feet.
    👉 Check Price & Availability on Amazon
    The Expert Tip: Don’t forget to seal your eye treatment. Find the 0/5 non-clogging oil that locks in your results and prevents “Crepey” skin.
    👉 Why You Need Squalane Oil for Eye Care
  • How to Get Rid of Blackheads and Sebaceous Filaments: The Ultimate 3-Step Clear Pore Method

    How to Get Rid of Blackheads and Sebaceous Filaments: The Ultimate 3-Step Clear Pore Method

    We have all been there: leaning into a magnifying mirror, frustrated by the cluster of tiny, dark dots across our nose and chin. It feels like an endless cycle. You use a pore strip or squeeze them out, only for the same “blackheads” to return just a few days later. This persistent congestion is one of the most common skincare complaints, yet it is also the most misunderstood.

    The secret to finally clearing your pores is realizing that those dots might not be blackheads at all. In many cases, you are looking at sebaceous filaments—a natural and necessary part of your skin’s anatomy. While a blackhead is a “plug” that needs to be treated, a sebaceous filament is an active “pipe” that delivers moisture to your face. Because they look so similar, many people accidentally damage their [healthy skin barrier] by using harsh, aggressive methods that actually make their pores look larger over time. This guide provides the definitive 3-step “Melt, Clear, and Seal” method to achieve tight, clear pores safely.


    1. The Difference: Clogged Pores vs. Natural Channels

    Before you can fix the problem, you have to know what you are looking at. While both look like tiny dots, they represent two very different states of your skin’s oil production. To help visualize this, think of your pores like a plumbing system: one is a clog that has backed up the drain, while the other is the pipe itself.

    Blackheads (Open Comedones): These are the “Clogs.” They form when a mix of dead skin and sebum becomes trapped at the opening of the pore and hardens into a solid plug. When that plug is exposed to air, it oxidizes and turns black.
    Sebaceous Filaments: These are the “Pipes.” They are a natural and necessary part of your skin’s anatomy. Their job is to channel oil to the surface to keep your [skin barrier] hydrated. They are flat, never raised, and usually look grey or tan.

    2. Why You Should Stop Using Pore Strips and Squeezing

    When people see dots, their first instinct is to pull or squeeze them out. This is a temporary fix that leads to long-term damage. Forceful removal is one of the most common causes of [skin irritation] and texture issues.

    The “Elasticity” Problem: Your pores are like rubber bands. When you use a pore strip, you “snap” the skin around the opening. Over time, the pore loses its ability to stay tight, which is the #1 cause of permanently enlarged pores.
    The Barrier Breach: Strips rip off a layer of your living [skin cells]. This weakens your shield, leading to redness and even more oil production as your skin tries to protect itself.
    The Rebound Cycle: When you physically pull a filament out, your skin immediately panics and floods that “hole” with fresh oil. This is why the dots seem to return within just 48 hours.

    3. The 3-Step Clear Pore Method: Melt, Clear, and Seal

    To clear your pores safely, we move away from “Pulling” and move toward “Melting.” This method relies on chemistry to liquefy the hardened debris inside your follicles so they can be rinsed away naturally.

    Step 1 (The Oil Melt): Start with a high-quality Jojoba Oil. Massage the oil into your dry face for 60 seconds. Because Jojoba is a “sebum mimic,” it sinks deep into the pore to liquefy the hardened oil plugs.

    Step 2 (The Deep Clear): After a gentle second wash, apply an oil-soluble acid like Salicylic Acid (BHA) to completely dry skin. BHA travels inside the “pipe” to dissolve the remaining dead skin cells and bacteria.

    Step 3 (The Structural Seal): Once the pore is clear, apply a Niacinamide serum to tighten the walls, followed by 2 drops of Squalane Oil. This provides a non-clogging seal that tells your skin it is safe and hydrated, preventing the “rebound” oiliness.

    4. Hero Ingredients: BHA, Jojoba Oil, and Niacinamide

    Consistency with these three ingredients is the only way to keep your nose and chin looking clear and achieving a [refined complexion].

    Salicylic Acid (BHA): The only acid that can penetrate oil. It is essential for managing clogged pores. *Find our top picks:* [Best BHA Toners and Pads].
    Jojoba Oil: A sebum mimic that dissolves plugs without causing new breakouts. *See why it works:* [Jojoba Oil for Acne-Prone Skin].
    Niacinamide (Vitamin B3): The “Pore Tightener.” It improves skin elasticity so the pore opening physically looks smaller.

    5. FAQs: Pro-Tips for Pore Perfection

    Q: Will sebaceous filaments ever go away forever?
    A: No, and you don’t want them to. They are a vital part of your skin’s hydration system. However, using the [Medicube Zero Pore Pads] 2-3 times a week will keep the oil moving so they stay light, flat, and almost invisible.
    Pro-Tip: Focus your treatment only on the “porous” areas (nose, chin, forehead) to avoid drying out your cheeks.
    Q: Why does my skin feel “gritty” when I massage with Jojoba Oil?
    A: That is the goal! This is known as “gritting.” Those tiny, sand-like particles are the hardened sebaceous filaments being physically dissolved and pushed out of your pores. It’s a sign that the “Melt” phase of your routine is working.
    Pro-Tip: Massage for a full 60 seconds to allow the lipids enough time to liquefy the plugs.
    Q: Can I use this method if I have dry or sensitive skin?
    A: Yes, with a small adjustment. BHA can be drying. If you have dry skin, use the Lactic Acid version of the Medicube pads and only use them on your nose. Follow immediately with a Ceramide cream to keep your barrier strong.
    Pro-Tip: Use Squalane Oil as your final step; it is the most gentle, non-clogging sealer for sensitive types.
    Q: How long does it take to see a real difference in my blackheads?
    A: Patience is key. You will see immediate surface smoothing, but a permanent reduction in clogged pores takes about 4 to 6 weeks. This is how long it takes for your skin’s cell turnover cycle to fully reset.
    Pro-Tip: Take a “Before” photo today. Pores change slowly, and a photo is the only way to see your structural progress.

    6. Conclusion: Achieving a Clear, Radiant Tone

    Achieving a [refined complexion] is about working with your skin’s natural biology, not fighting it with aggressive strips or physical force. By understanding the critical difference between a blackhead (a clog to be removed) and a sebaceous filament (a channel to be managed), you can finally stop the cycle of irritation and rebound oiliness. The “Melt, Clear, and Seal” method is the only scientifically sound way to achieve permanently tight, clean pores while maintaining a [healthy skin barrier].

    Consistency is the most important part of this journey. Stick to your double cleansing ritual, use your BHA strategically, and always seal the skin with non-comedogenic lipids like Squalane. By following this expert protocol, you move past temporary fixes and build the foundation for a smooth, luminous, and truly clear complexion.


    Ready to Clear Your Pores for Good?

    Start your journey to a smoother texture today with our top-rated recommendations:

    The Essential Shop: Find the best oil cleansers and acid toners for your skin type.
    👉 [Shop The Best Pore-Clearing Toners and Non-Comedogenic Oils Now!]
    The Master Routine: Learn how to layer these ingredients into a complete K-Beauty regimen.
    👉 [Building Your K-Beauty Pore Care Routine: Step-by-Step for Smoother Skin]
    The Advanced Fix: Ready for clinical results? See how specialized pads can transform your texture.
    👉 [Medicube Zero Pore Pad 2.0 Review: The Best Dual-Textured Pads]
  • The Complete Olay Regenerist Skincare Routine: Layering Retinol, Peptides, and Niacinamide

    The Complete Olay Regenerist Skincare Routine: Layering Retinol, Peptides, and Niacinamide

    You have invested in the proven science of the Olay Regenerist line, but achieving visible skin firming and smoothing fine lines requires more than just a single cream. To unlock the full potential of these formulas, you must follow a strategic layering protocol that separates protection during the day from structural repair at night.

    Building an effective anti-aging routine can feel overwhelming, especially when managing potent actives like Retinol. However, the Olay system is designed for high compatibility. This guide provides the definitive step-by-step routine, explaining exactly how to sequence your products to maximize collagen and protect your [healthy skin barrier] without causing irritation.


    1. Foundation: The Essential Pre-Routine Prep

    Every successful routine begins with a pristine canvas. If your skin is not properly cleansed, your expensive [Peptide Serums] and Retinol will sit on top of dead skin and debris rather than penetrating the surface.

    Morning Prep: Use a gentle water-based wash like the Olay Regenerist Revitalizing Cream Cleanser to remove overnight oils.
    Evening Prep: Perform The Art of Double Cleansing. Use an oil-based cleanser first to melt away SPF and makeup, followed by a gentle wash.
    The Goal: To ensure a clean, pH-balanced base that is ready to absorb the structural active ingredients.

    2. AM Routine: Protection, Hydration, and Peptides

    The morning is about defense. You need to shield your skin from environmental damage while providing the structural signals needed for all-day firming.

    Step 1 (Antioxidant): Apply a stable Vitamin C Serum to neutralize free radicals caused by the sun.
    Step 2 (Firming): Apply your Olay Regenerist Micro-Sculpting Cream or Collagen Peptide 24. This delivers a continuous dose of Amino-Peptides to boost elasticity.
    Step 3 (Shield): Apply an Olay day cream with SPF 30 or higher. This is the most critical step to prevent the UV damage that breaks down your existing collagen.

    3. PM Routine: Retinol, Repair, and Maximum Collagen

    Your skin enters “repair mode” while you sleep. This is the only time you should use the [Retinol24] line, as Vitamin A can be deactivated by sunlight and increase sensitivity.

    Step 1 (Treatment): Apply the Retinol24 Night Serum to clean, dry skin. This concentrated formula accelerates cell turnover to smooth texture.
    Step 2 (Repair): Layer the Retinol24 Night Moisturizer over the serum. This provides a second dose of Retinol buffered by Niacinamide to prevent dryness.
    Step 3 (Mandatory Seal): For best results, press 2 drops of Squalane Oil over your Olay products. This prevents TEWL and eliminates the “sandpaper” texture common with Retinol use.

    4. Key Layering Conflicts to Avoid

    Even a safe line like Olay Regenerist has boundaries. To avoid a damaged barrier and severe skin irritation, you must respect the chemical conflicts of Vitamin A.

    The Acid Rule: Never use strong exfoliating acids (like AHA/BHA pads) on the same night as your Retinol24 products. This will cause redness and peeling.
    The Strategy: Use the Medicube Zero Pore Pads on Monday and Wednesday, and use your Olay Retinol routine on the other nights.
    The Buffer: If you have sensitive skin, always use the Retinol Sandwich Method by applying a light layer of moisturizer before and after your treatment.

    5. FAQs: Mastering Your Olay Routine

    Q: Can I use the Micro-Sculpting Cream and Retinol24 together?
    A: Yes, but separate them. Use the Micro-Sculpting Cream (Peptides) in the morning for firming, and the Retinol24 line at night for renewal.

    Q: How long should I wait between steps?
    A: Give each layer about 60 seconds to absorb. For Retinol, wait until the skin is bone-dry before applying to minimize the risk of stinging.

    Q: Do I really need an oil seal at night?
    A: For most people, yes. Retinol is naturally drying. Using a non-comedogenic oil like Squalane or Jojoba ensures your [skin barrier] stays strong while the Olay actives work.

    6. Conclusion: Precision for Anti-Aging Results

    Consistency is the secret to the Olay Regenerist Skincare Routine. By strategically separating your Vitamin C protection in the morning from your Retinol repair at night, and providing structural Peptide support throughout the day, you create the optimal environment for collagen synthesis. Follow this protocol daily, prioritize barrier-repairing sealants, and you will achieve a visibly firmer, smoother, and more radiant complexion.


    [Call to Action Button]

    Shop The Full Olay Regenerist System for Anti-Aging Results Now!